Hands-On Review
The 3DMakerpro Seal 3D Scanner
3DMakerpro is back with their latest 3D scanner release, offering higher accuracy in a new compact form.
The new scanner from the company maintains the animal-themed naming conventions of past iterations, this time, with the most recent product being named “The Seal”.
The Seal has a whole bunch of features crammed into its compact package including anti-shake optical lenses, 24 bit color scanning, and can also lay claim to being the world’s first 0.01mm accuracy consumer 3D scanner.
So without further ado, let’s see what else the latest 3D scanner from 3DMakerpro has to offer.
The Seal Overview
The Seal comes in two different variants, which are The Seal, and The Seal Lite. We were sent The Seal (non-lite) version, so that’s what we will be reviewing in this article.
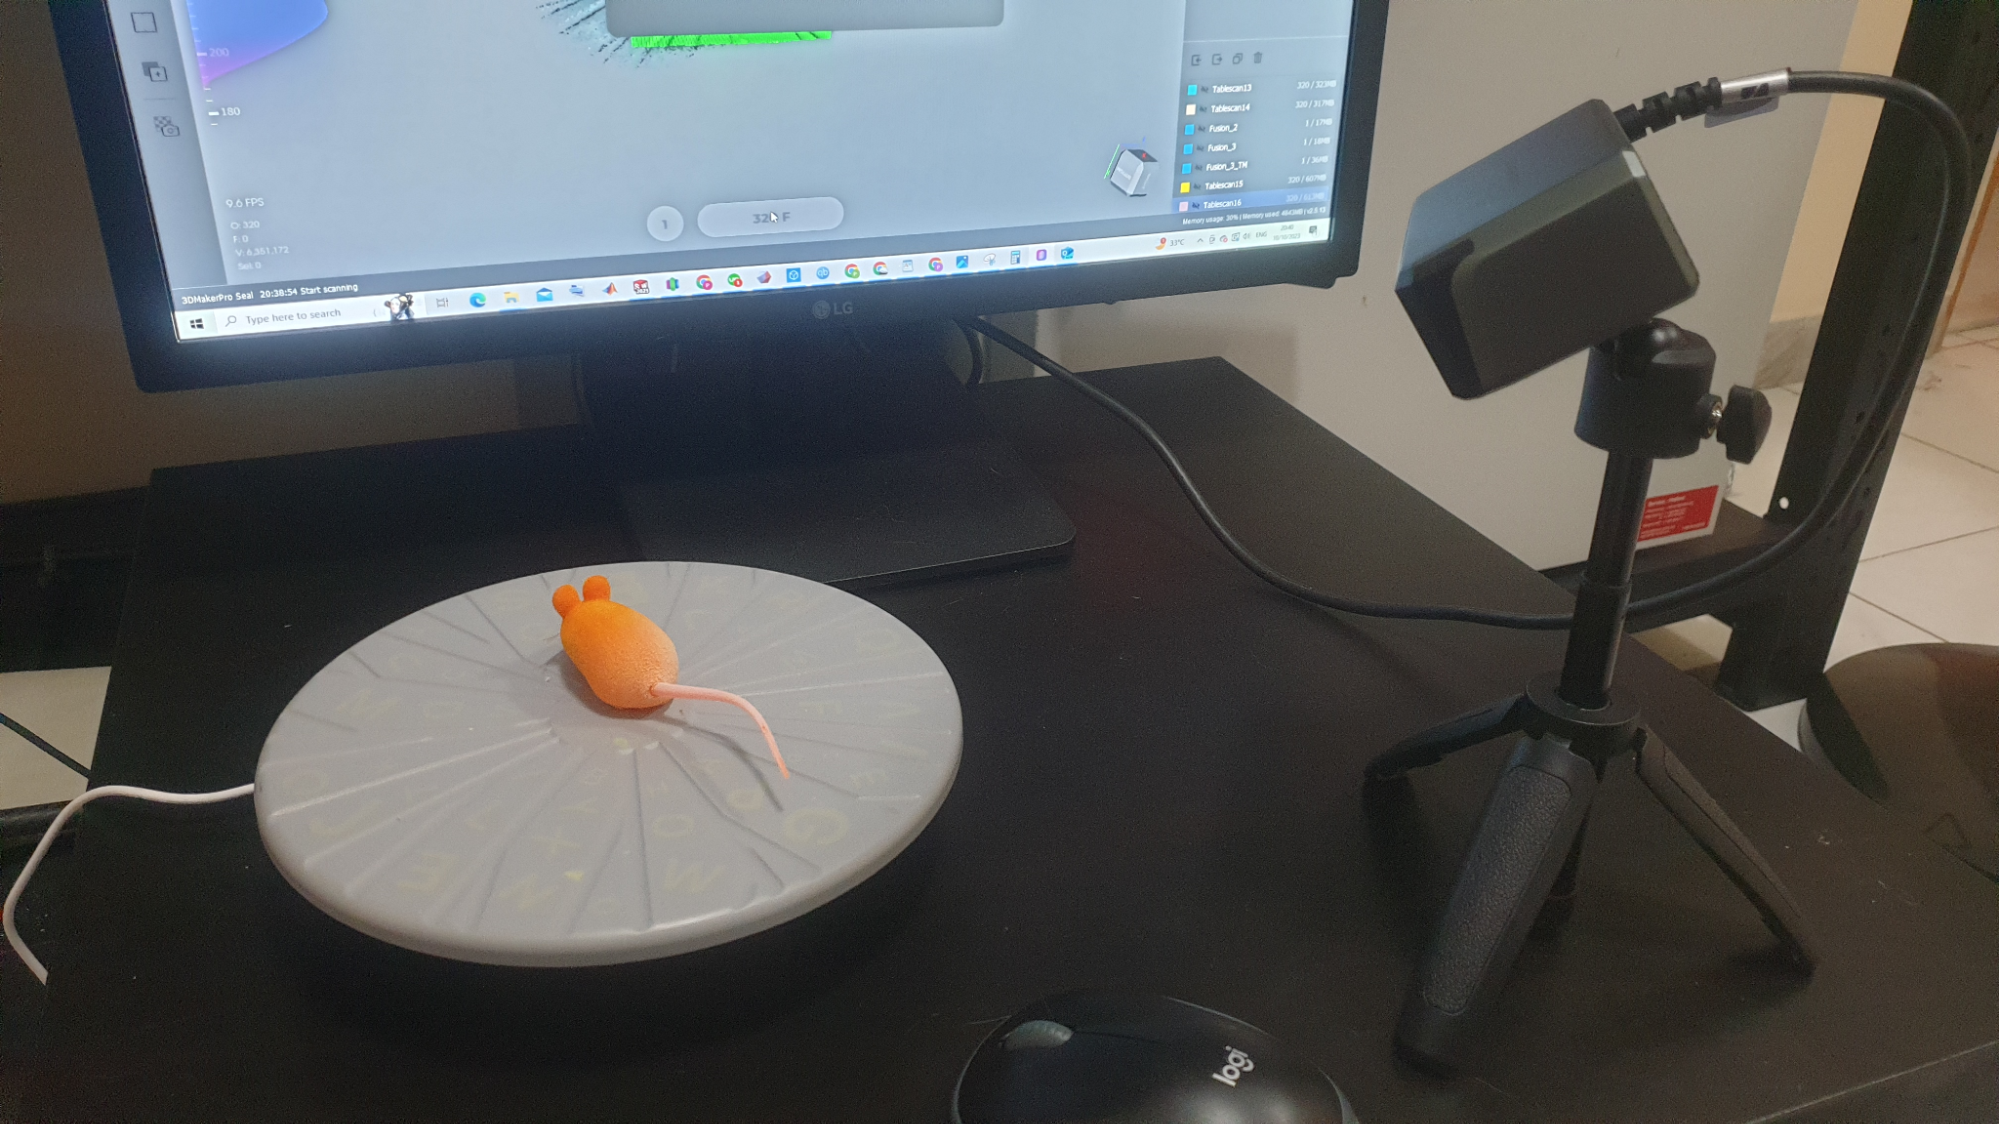
Opening the box, users are greeted by the small scanner unit, a tripod, and all the necessary cables to get started. In addition, we were sent a turntable, for scanning small objects in the software’s “table mode”. More on that later.
You can see The Seal with its tripod in the image below. The tripod is adjustable in height, so users can position the scanning angle from above the item being scanned, if needed.


As you can see from the photo, it is a small-sized unit, measuring just 110x60x35mm, meaning you can literally carry it around in your jeans’ pocket if you wanted to. We would recommend carrying it in a bag though, so you don’t get pocket fluff all over the lens.
Scanner Features
Within its diminutive housing, The Seal packs the following features:
- Accuracy: The Seal has 0.01mm accuracy, which is a first in the world of consumer-grade scanners, and a resolution of 0.05mm.
- 24 bit Color Scanning: The Seal features a high-definition color texture camera, so you can capture color textures without the need for a separate DSLR or other digital camera. The camera has a high-quality color CMOS image sensor, making models come to life (more on that later).
- Anti-Shake Optical Lenses: The Seal has anti-shake optical lenses, making a more stable scanning experience for the user.
- Blue Light: Compared to traditional LED and NIR light sources used on other scanner, The Seal uses blue-light, which has a shorter wavelength (400 to 500 nanometers) capable of producing more precise structured light. This results in higher scanning accuracy and image resolution, allowing for the capture of the smallest of details.
Optional Extras
- Professional-grade multi-axis turntable: You can choose to equip a professional-grade dual-axis turntable, which intelligently completes multi-angle model scanning and easily improves the quality of model scanning.
- AI Smart + Power Grip: The Seal has an optional gimbal attachment, which connects to a smartphone, enabling freedom to scan anywhere, when away from the computer…even outdoors, in bright sunlight. The Power Grip comes equipped with a high-performance 10000mAh lithium battery that allows the scanner to work continuously for 240 minutes. You can see the Smart Grip in action in the video below.

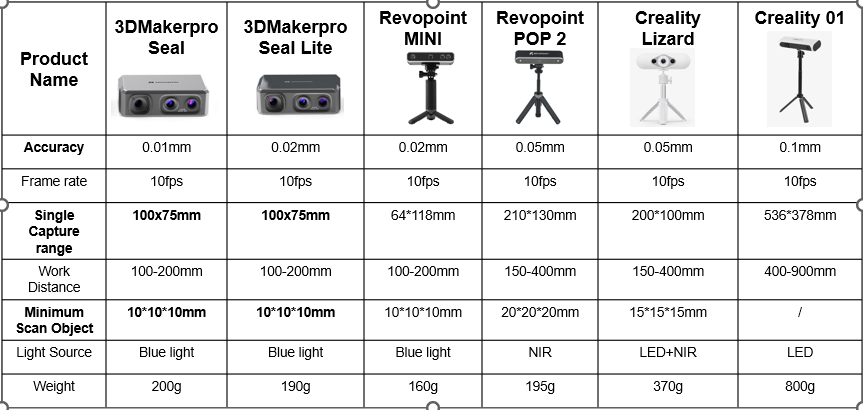
For your ease of reference, you can see how The Seal and Seal Lite compare to each other, and to other 3D scanner models from other brands in the table below.

Hands-on Review
Now we have seen what The Seal has to offer, let’s take a look at how it behaves in real-life.
We previously reviewed The Mole scanner, and found it to be easy to use, despite it being my first attempt to use a 3D scanner. The ease of use was largely down to the JMStudio software, which the company accurately describes as “rookie-friendly”.
Again, the same JMStudio install was used for the review of The Seal, and the software detected the scanner automatically without needing to update, as soon as The Seal was plugged into the USB port on my computer.
The software workflow for The Seal is exactly the same as for The Mole, except with The Seal, users can scan textures directly without the need for the “Color Kit”.
JMStudio offers a logical progression, with pop-up help guiding the user along the scanning and editing stages, so you can pretty much start scanning without the need for a manual.
Scanning Modes
The software enables scanning in three different modes, which are “table mode” , “easy mode” and a hybrid approach that allows handheld operations with the turntable. All modes can be used without the need for adding sticky markers to the object being scanned, thanks to the smart software.
Table Mode operates with a turntable, where the object is placed and scanned while rotating at a constant rate, requiring the user to position it appropriately, and adjust settings like brightness and sensitivity before initiating the scan. For precise scanning, multiple passes and different angles are needed to capture obscured features.
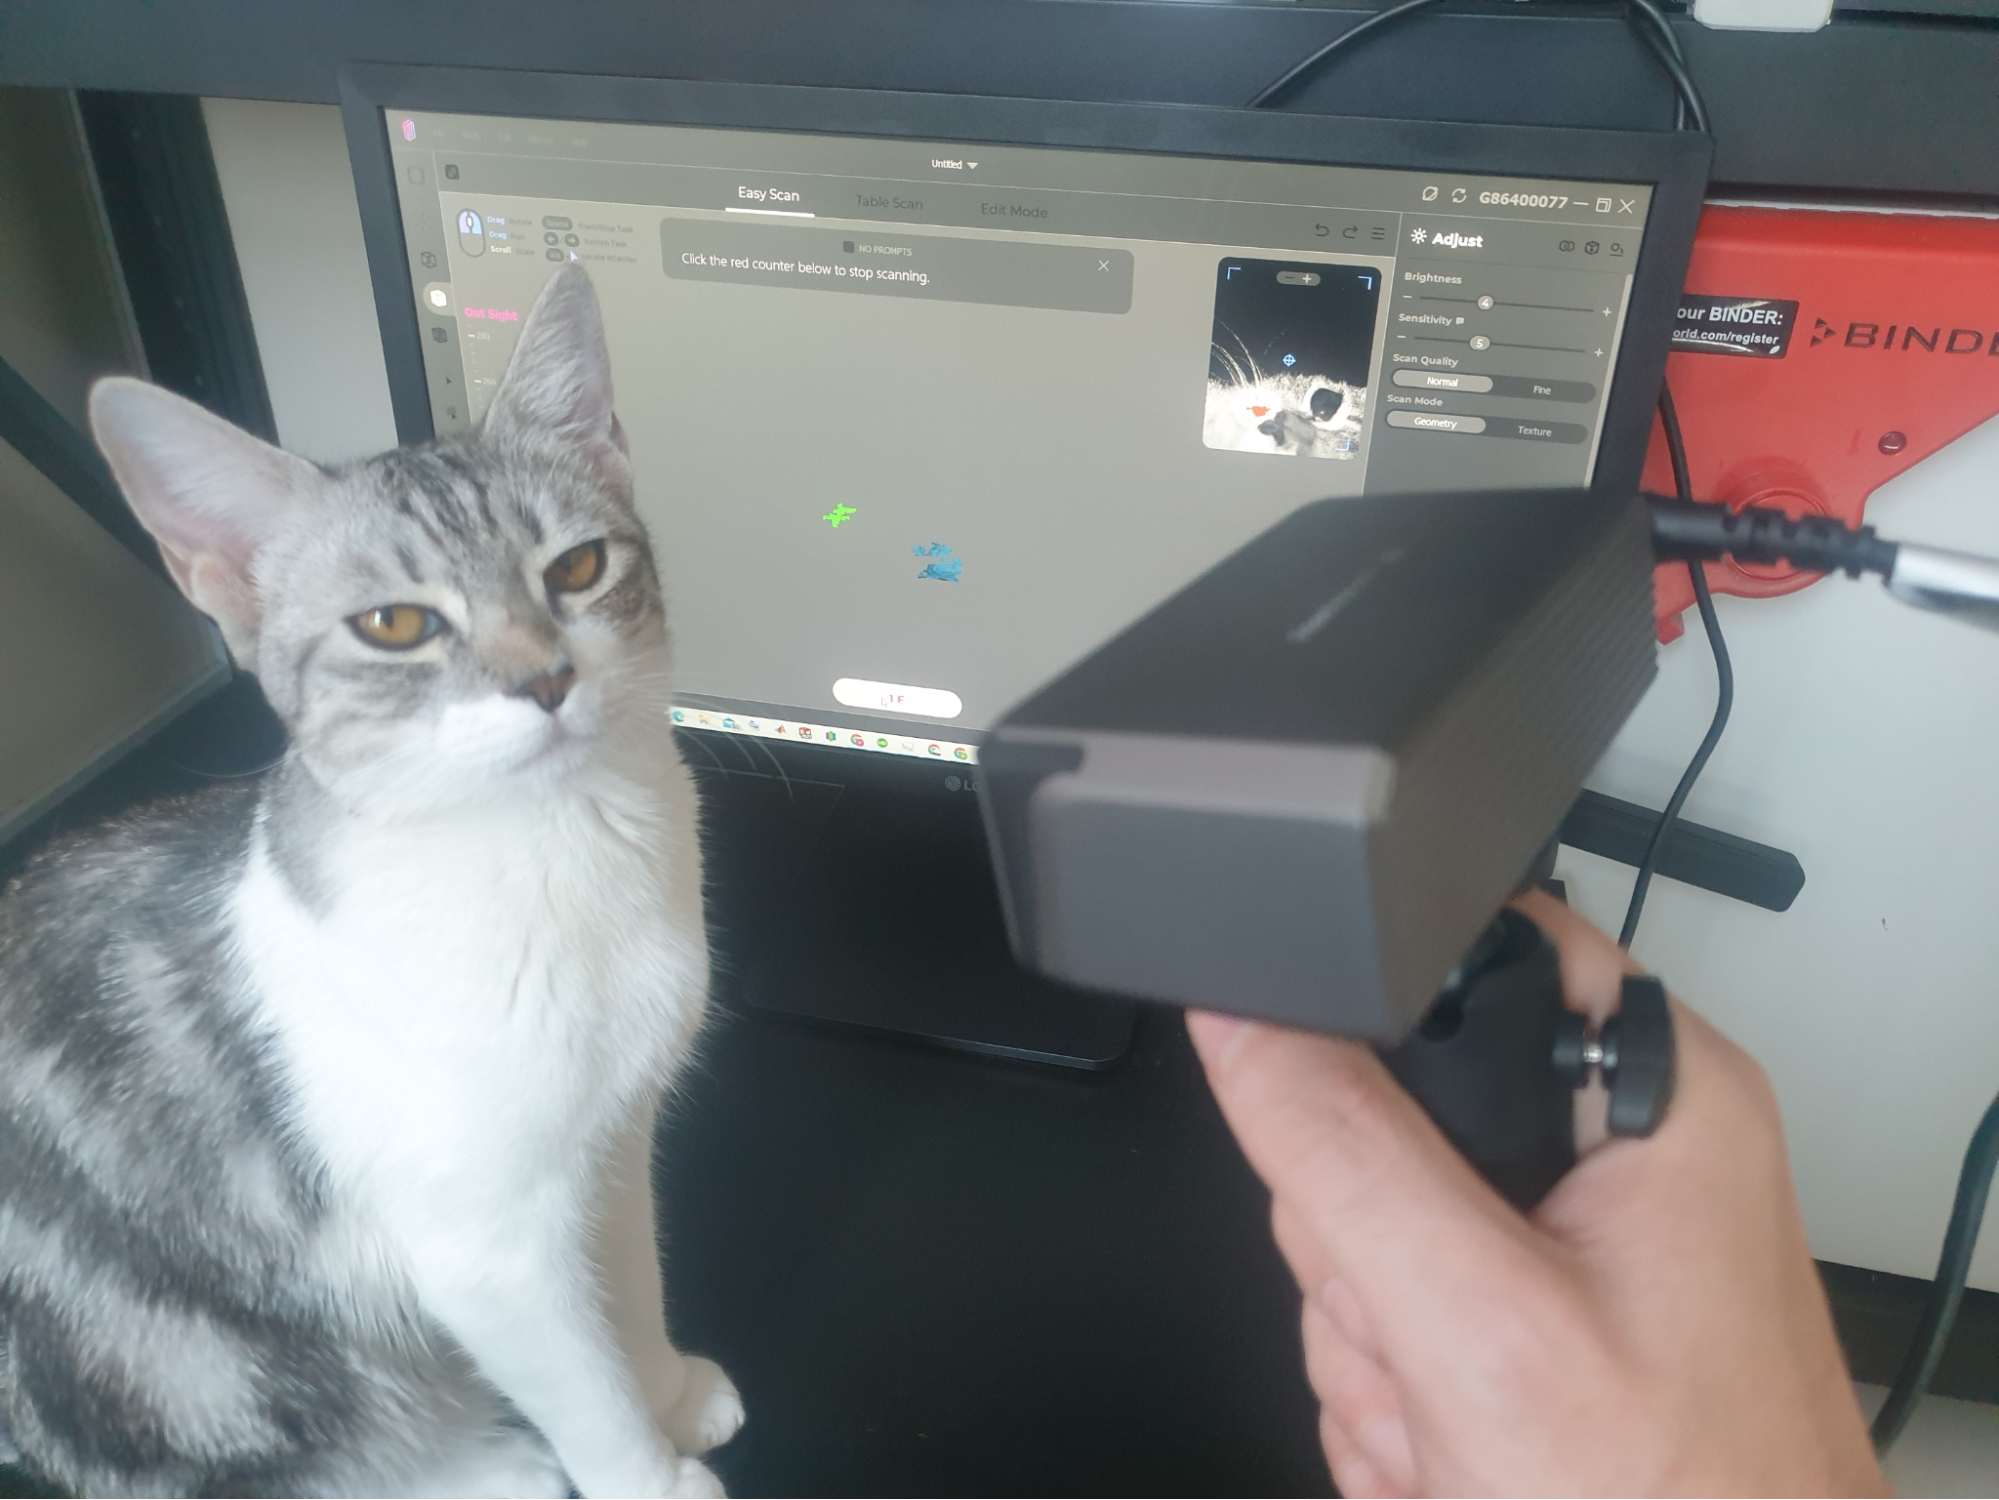
With Easy Mode, users can operate the scanner by hand to explore larger objects from all angles. This is particularly useful for items such as car parts or living beings that may not fit onto the turntable. Note that some living beings may be more cooperative than others, and scanning results may vary depending on the subject’s ability to stand still.

An added advantage is the real-time feedback from the software, guiding you to maintain the optimal distance between the scanner and the object, ensuring every detail is captured immaculately.
The “Amend” function in the software allows adding new scans from different angles and the “Align” feature facilitates merging these scans into a coherent 3D model, which can be done manually or automatically. After alignment, the scans are processed to finalize the 3D model.
After attempting (and failing) to scan Hoshi (my cat), I decided to scan something a little more cooperative. I was working on a design project for a client, and needed a model of a bearing to fit into my CAD assembly.

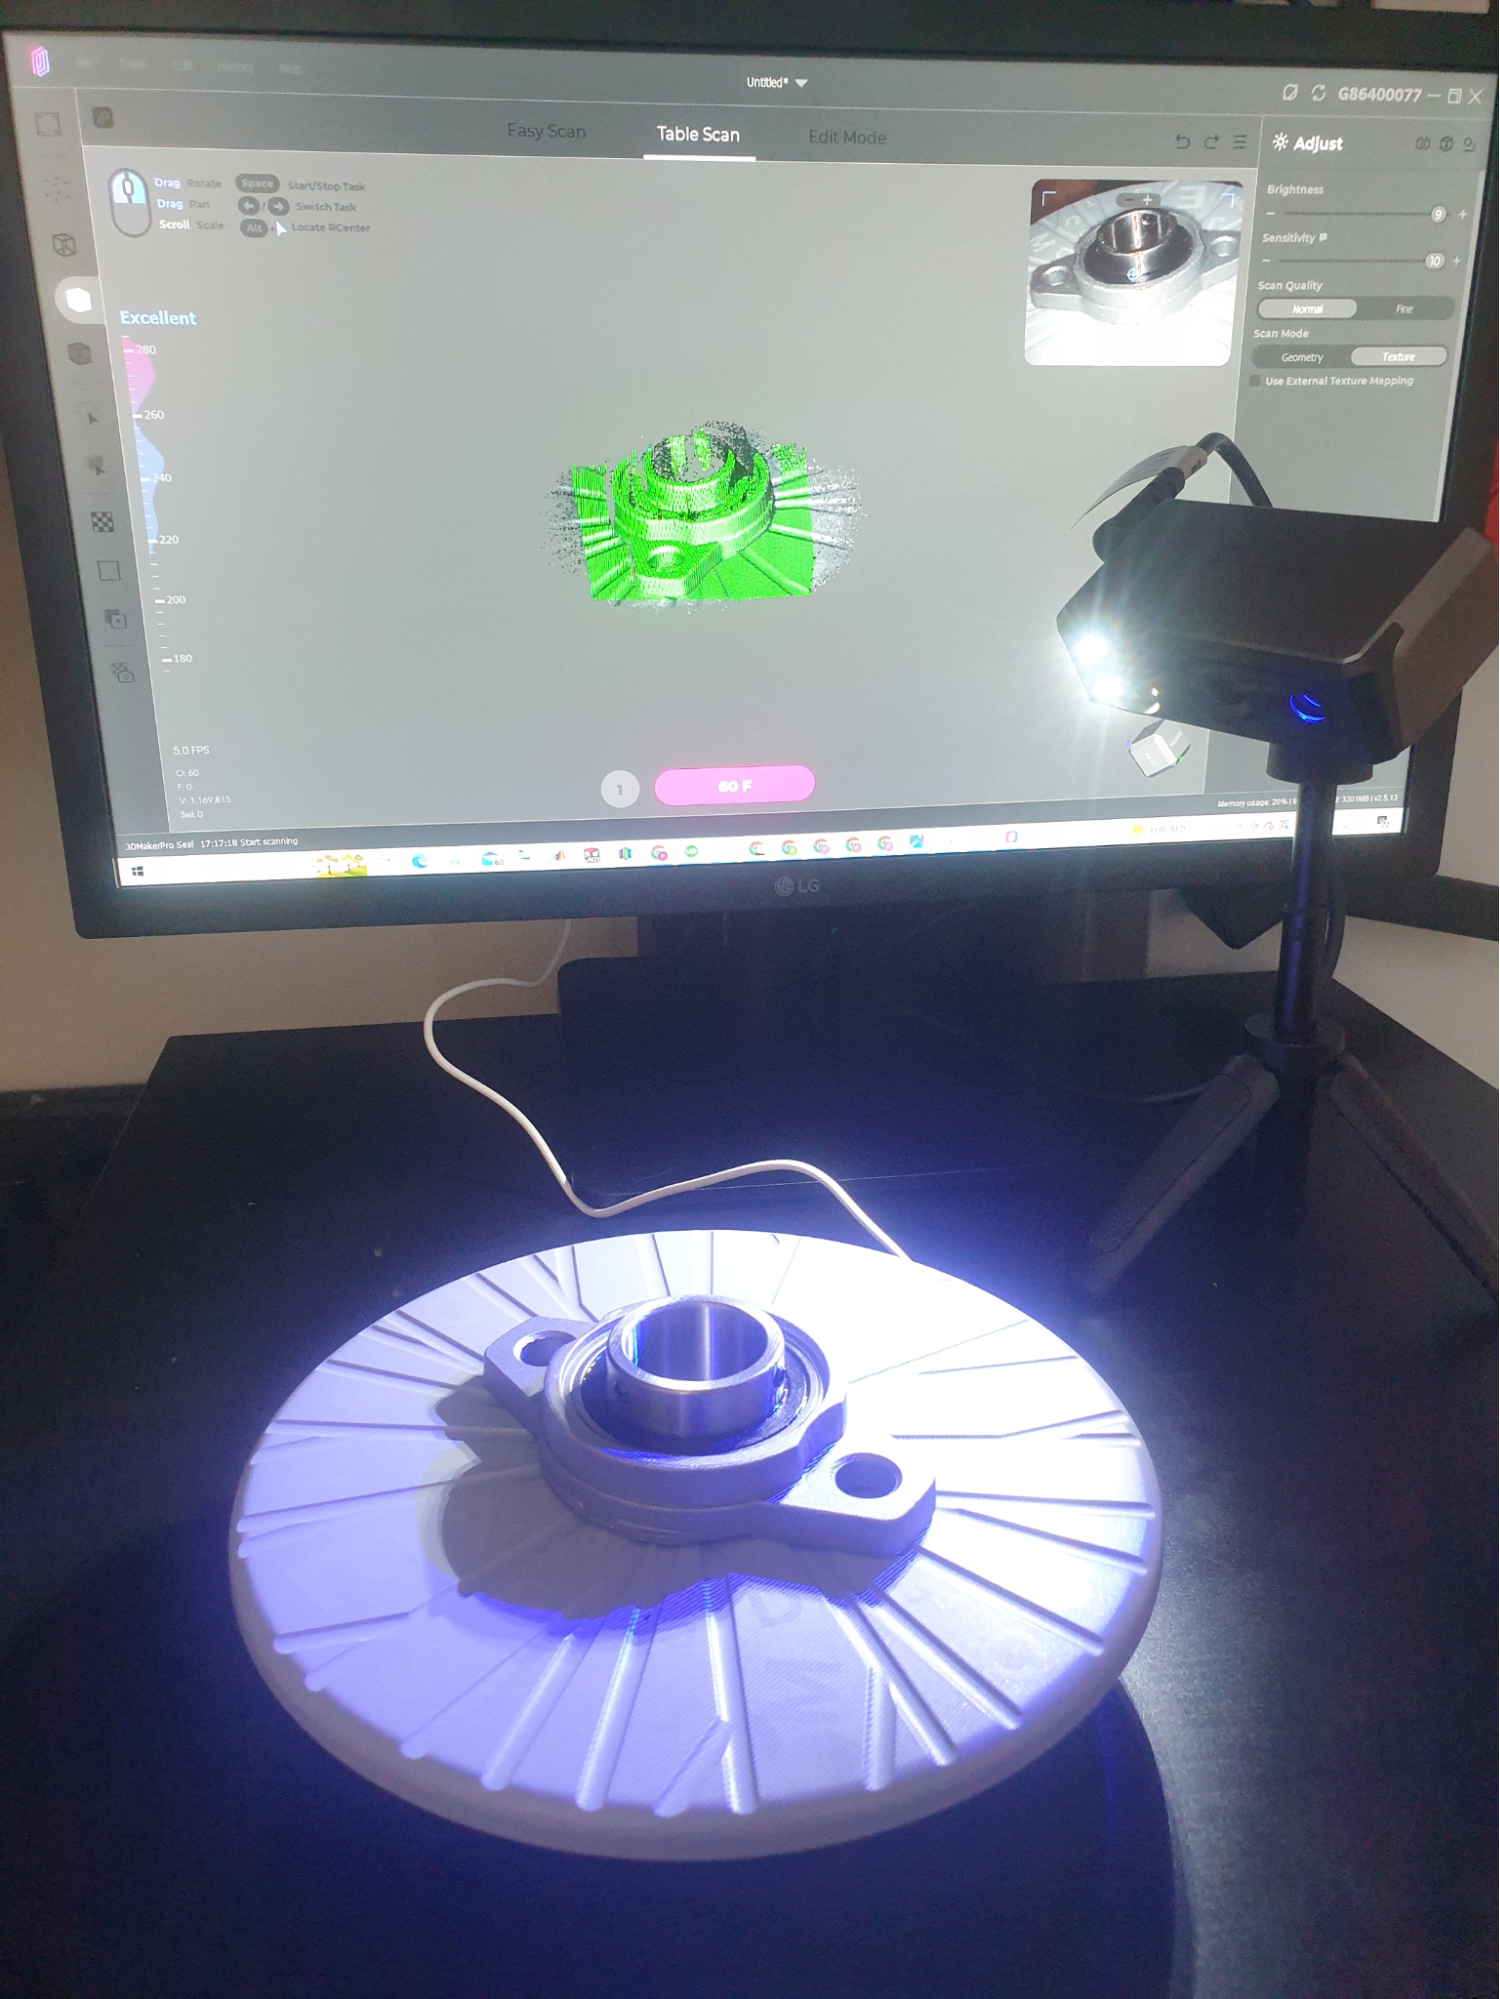
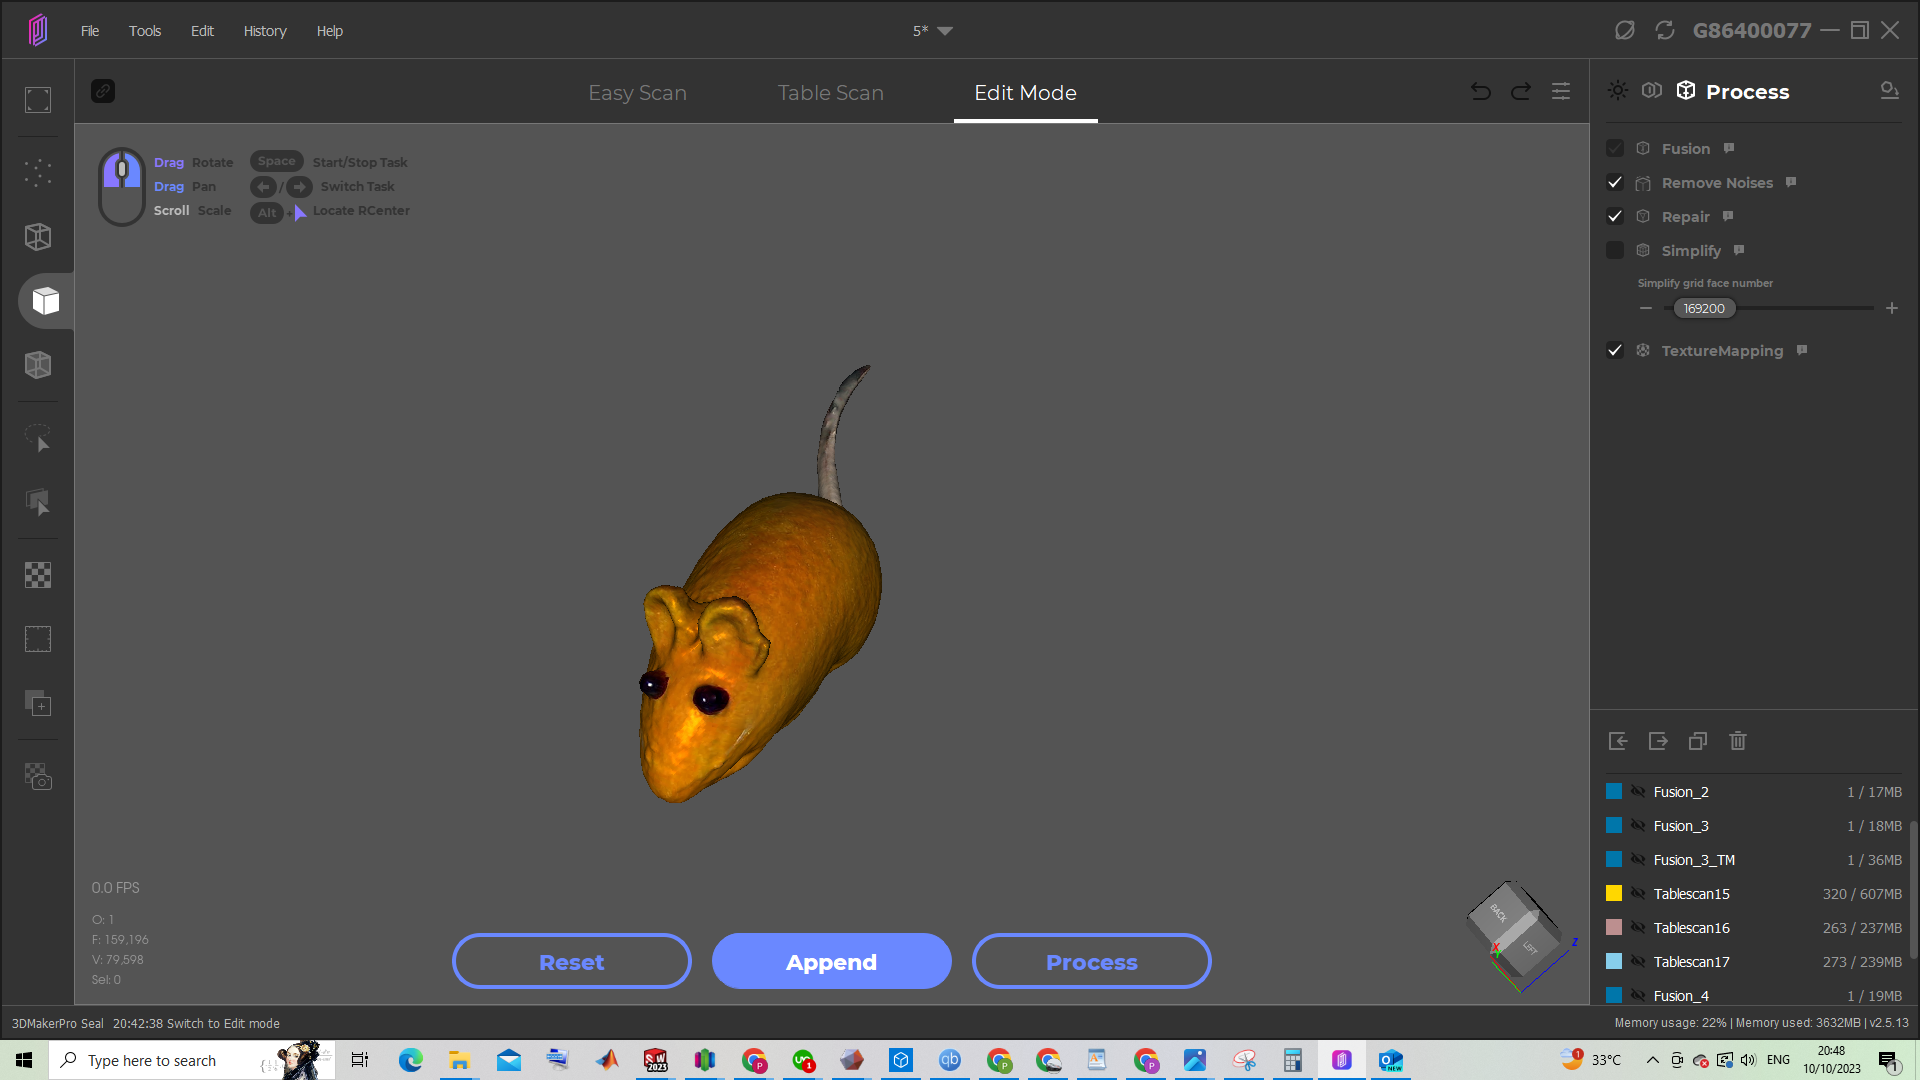
I tried the geometry scan first, and then attempted a texture scan, which performs both the geometry scan and texture scan at the same time. You can see what that process looks like in the image above.
I would say that The Seal appears to capture metallic surfaces better than The Mole did. In the previous review, The Mole struggled to capture shiny surfaces on an eBike, but when scanning the bearing, which has a cast metal pillow block and machined steel races, The Seal captured both metallic surfaces without issues, although tweaking the sensitivity and brightness settings in the software can certainly help to create a better scan.


After taking multiple scans, and aligning them into a cohesive shape, the processing got rid of the noise and turned the raw scan data into a proper 3D surface part. You can see the resulting textured color scan in the image above. I tried scanning a cat toy (below) to see how it coped with different textures.
After scanning, aligning and processing, the resulting part can be exported as an STL, OBJ or PLY file, for use in your preferred CAD software or other 3D environment. I imported the STL into Solidworks for use in the assembly. Be aware, that because the scans are high resolution, the resulting STL may contain many facets.
The number of facets can be controlled prior to scanning, or can be simplified in the post processing stage in JMStudio. Alternatively, you can reduce the number of facets in STL editing software such as Meshmixer. It is recommended to reduce the facets if using in Solidworks, as it can be quite processor-hungry when attempting to concert STLs with a large number of facets into a solid file.
Conclusion
The Seal is a great new compact entry to the range of scanners from 3DMakerpro, and is available at a very attractive price point, especially when you consider it is the first consumer-grade 3D scanner with 0.01mm accuracy. This makes it not only good for scanning miniatures and other fun things, but useful for engineering work also (provided your work doesn’t need accuracy greater than 0.01mm).
Certainly, for scanning car body parts, it is more than sufficient to capture such parts accurately. For reverse engineering parts for 3D printing, it is also perfectly capable, especially as most desktop printers have an accuracy of around +/-0.1mm. The Seal is more accurate than your 3D printer.
The Seal retails for $699, and The Seal Lite will retail for $349, but you can get them at discounted rates from the Indiegogo page here.
Anycubic Photon M5S
- - Print size: 218 x 123 x 200 mm
- - 19 micron print accuracy
- - 10.1 inch mono screen

Creality K1
- - Print size: 220 x 220 x 250 mm
- - fully enclosed
- - dual-gear direct extruder
Bambu Lab X1 Carbon AMS Combo
- - Print size: 256 x 256 x 256 mm
- - fully enclosed
- - Built-in camera monitoring